DIY Tips for Fixing Cracked Walls in Your Dog’s House
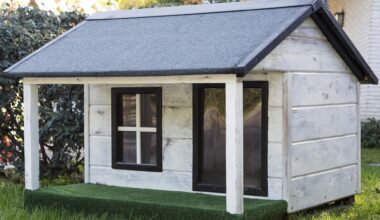
Maintaining your dog’s house is essential for their comfort and safety. One common issue that many dog owners face is cracked walls. These cracks can lead to insulation problems, making your dog cold in winter or hot in summer. In this guide, we will explore various DIY tips for fixing these cracks effectively. One of the first steps you can take is to assess the severity of the cracks. Small surface cracks may be easier to fix than larger, structural cracks. Inspect the material of your dog house, as different materials may require different repair methods. For wooden houses, wood filler might be necessary, while plastic houses could need a specialized adhesive. Understanding the type of material you are dealing with will help you select the right products and methods for the repair. Prepare your workspace by gathering all required tools and materials beforehand. This ensures a smoother workflow and minimizes disruptions during the repair process. Let’s take a closer look at the specific materials and methods that can be used in detail to fix these cracks efficiently.
In addition to assessing the crack size and house material, choosing the right repair method is crucial. For small cracks, you may consider using spackle or caulk. Spackle is great for lightweight fillings and can easily be smoothed out after application. Caulk, on the other hand, provides a more weather-resistant seal that is useful for outdoors, ensuring that your dog remains protected from the elements. Ensure that the surface around the crack is clean and dry before applying any filler. This will help improve adhesion and the overall finish of your repair job. For larger cracks, a more robust approach, like adding wood shingles or a patch, might be necessary. You can cut a piece of wood to fit the size of the crack, then use wood glue or screws for a secure hold. After applying the patch, sanding down the area will ensure a smooth finish and prevent your dog from getting splinters. Painting or staining the repaired area will also make it blend more seamlessly with the rest of the structure.
Sealing and Insulating Your Dog’s House
Once the cracks are repaired, consider sealing and insulating the dog house. Insulation is vital to maintain a stable temperature inside, keeping your dog comfortable regardless of the season. Foam insulation panels can be effective in helping regulate the temperature, and they can be easily installed on the inner walls of the house. Make sure to measure properly and cut the panels to fit snugly in each area, sealing the edges with weatherproof tape for added durability. Additionally, consider adding a roof overhang if your dog house lacks one, as it can help protect the walls from moisture and the elements, prolonging the longevity of your repairs. A well-insulated and sealed dog house serves not just as a shelter but also as a safe haven for your furry friend. Regular checks of the insulation and sealing are recommended, especially after enduring extreme weather conditions. Having a comfortable space will prevent your dog from developing health issues related to exposure, especially in harsher climates.
Furthermore, remember that ventilation is key when fixing and maintaining your dog’s house. While insulation is important, adequate airflow prevents mildew and odors from accumulating inside. If your dog house has no existing vents, you might consider adding some. For example, small screened openings near the roof can facilitate airflow while keeping pests out. Additionally, an exhaust fan can help in significantly improving air circulation but can be more complex to install. Regardless of the method you choose, ensure that fresh air is allowed in while still keeping your dog protected from direct drafts. Regular cleaning is equally essential; this will not only improve the smell but also help maintain a safe environment. Use non-toxic cleaners whenever possible, and always allow the house to dry completely after cleaning before letting your dog back inside. A little preventive maintenance can go a long way in ensuring your pup has a safe and cozy home.
Choosing the Right Repair Materials
Choosing the proper materials for repairs can make all the difference when fixing cracks in your dog’s house. Always opt for pet-safe products to ensure your dog’s health isn’t compromised during repairs. For wood repairs, select non-toxic wood fillers, adhesives, and paints. Ensure they dry completely before allowing your pet back inside. For vinyl or plastic houses, look for repair kits designed specifically for those materials. These kits often include adhesive tubes and surface fillers, making repairs more straightforward. It’s also beneficial to use weather-resistant materials, as these will endure outdoor conditions better and last longer. At the same time, consider the aesthetic aspect; choose colors that will blend well with your dog’s house’s existing design. This way, the maintenance not only adds durability but also keeps the home visually appealing. Remember to think ahead; consider the longevity of the materials and how they’ll hold up under various weather conditions. Investing in high-quality repair materials will result in a safer and more comfortable living situation for your dog.
Before initiating repairs, it is equally important to gather the necessary tools for the job. A repair project is often frustrating without the right tools. Basic tools such as screwdrivers, a hammer, a utility knife, and a putty knife will suffice for most repairs. A drill might come in handy, particularly for larger cracks that require reinforcements. Additionally, consider keeping safety gear nearby, like gloves and safety goggles, to protect yourself during the process. This precaution ensures your safety and helps avoid accidents. Preparing your workspace is equally vital; a well-organized area allows you to work efficiently. Lay out all tools and materials and designate a specific location for them to streamline your workflow. Furthermore, having a trash bag for disposal is helpful to keep your workspace tidy. Taking proper measures before starting will make the entire process smoother and less stressful. After you complete the repairs, give your dog house a thorough inspection to ensure everything is in order before your dog is allowed back in.
Maintaining Your Dog’s House Post-Repair
After repairs and maintenance, ongoing care plays a vital role in ensuring the longevity of your dog’s house. Regularly inspecting the structure for new cracks or signs of wear can save you from extensive repairs later. Weather changes can affect wooden structures, leading to warping or splitting. You should schedule seasonal checks at least twice a year, preferably before winter and summer. Look for loose boards, cracks, and any pests that may have taken residence. Identify problems early to address them before they escalate. Additionally, keep the house clean; debris can trap moisture, leading to mold or rot in wooden structures. Regular cleaning minimizes odors and maintains a fresh space for your dog. Use a garden hose to rinse off the outside, and occasionally give the inside a thorough clean with pet-safe disinfectants. Lastly, consider applying a new coat of paint or sealant every few years to keep things looking fresh and protected. Taking these steps creates a safe, cozy, and appealing environment for your precious furry family member.